4.1 DNS Server
When IPv6 is enabled via the PCAPdroid settings, the IPv6 DNS server 2001:4860:4860::8888 will be used.
For IPv4 connections, PCAPdroid tries to detect the DNS server used by the device and use it. This only works on Android Marshmallow and after.
If the detection fails or the primary data connection (e.g. 4G or WiFi) changes, the 8.8.8.8 DNS server is used. You can review the currently used IPv4
DNS server in the Stats page.
4.2 DoH Support
PCAPdroid normally detects and blocks DNS-over-HTTPS requests. This is necessary in order to extract and display the DNS query being sent.
Since version 1.7.0, you can integrate PCAPdroid with InviZible Pro to encrypt your DNS traffic with DNSCrypt / DoH. In essence this allows you to get visibility on the DNS traffic in PCAPdroid while retaining the privacy benefits provided by DNSCrypt.
To do this, you need to:
1. In the Android network settings, disable the private DNS. This allows PCAPdroid to inspect plaintext DNS traffic
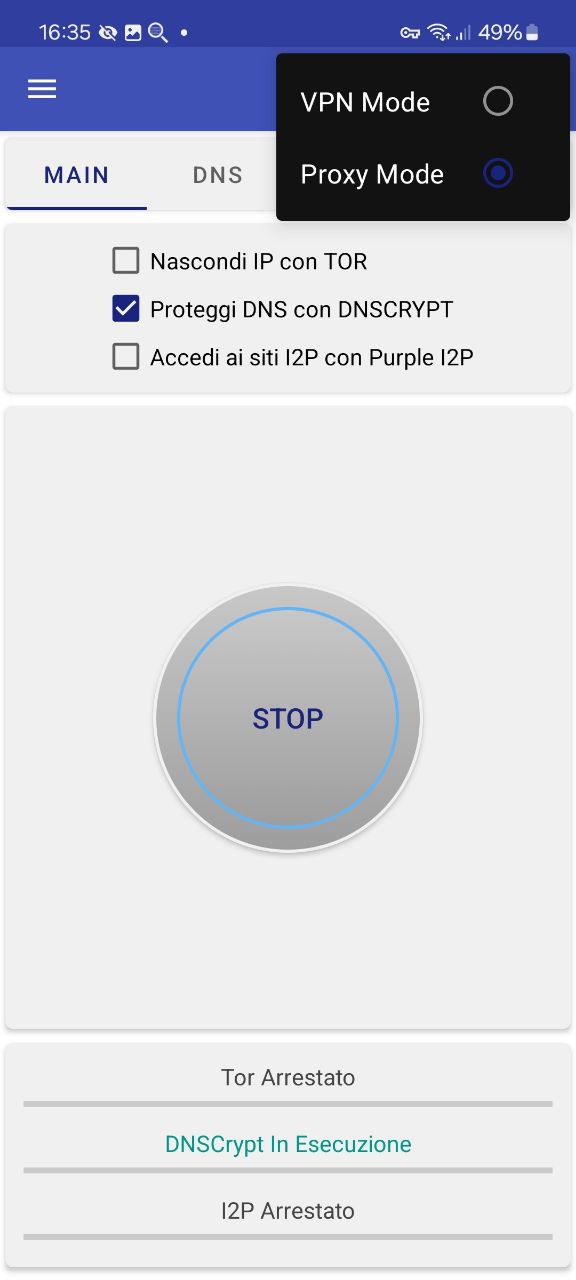
2. Install InviZible Pro, configure it in “Proxy Mode”, start it and wait until DNSCrypt is running
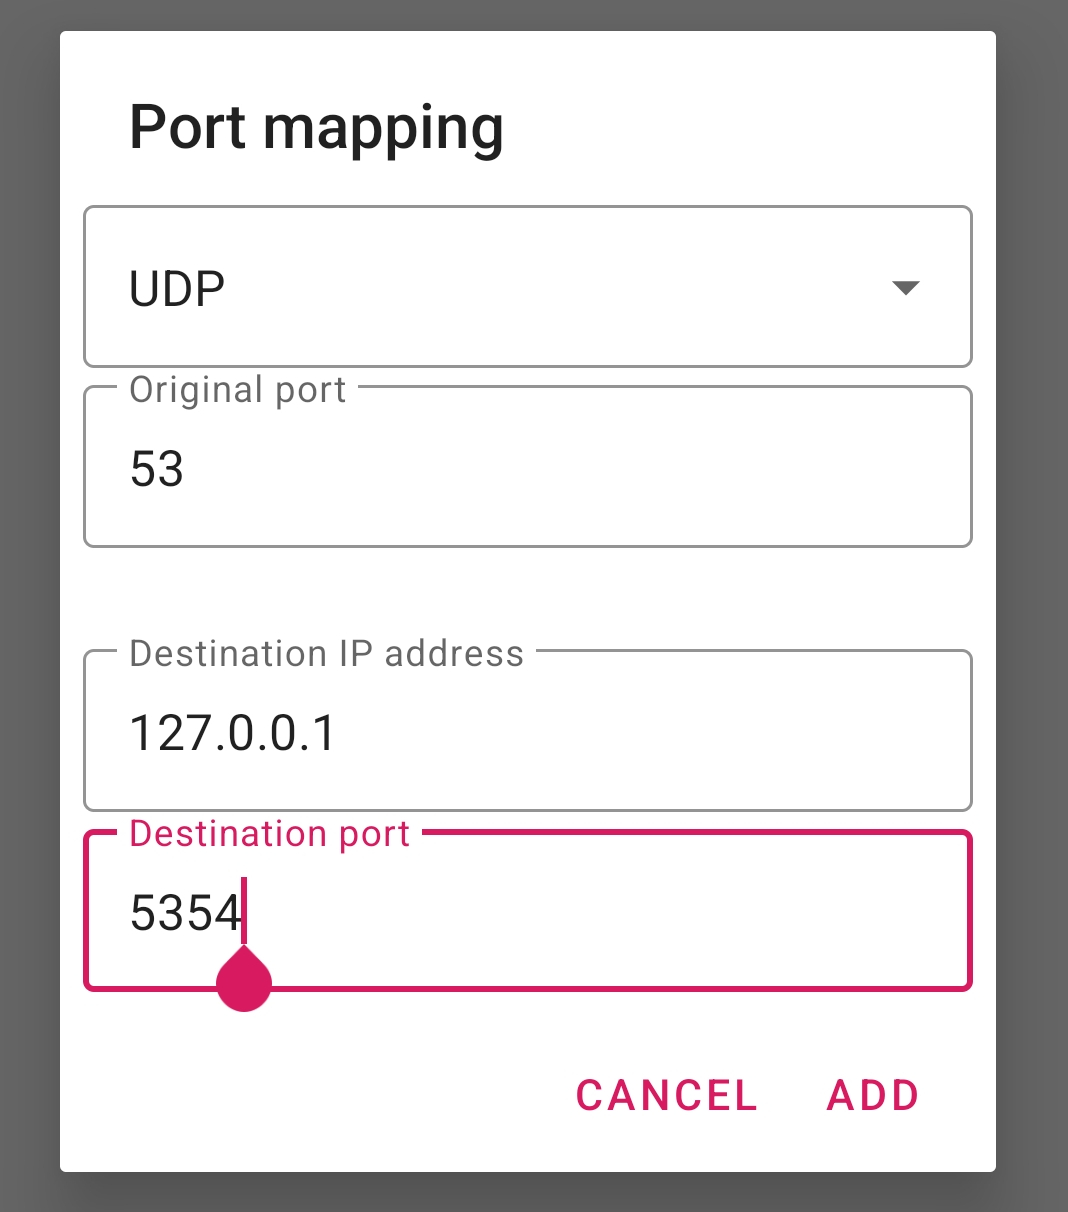
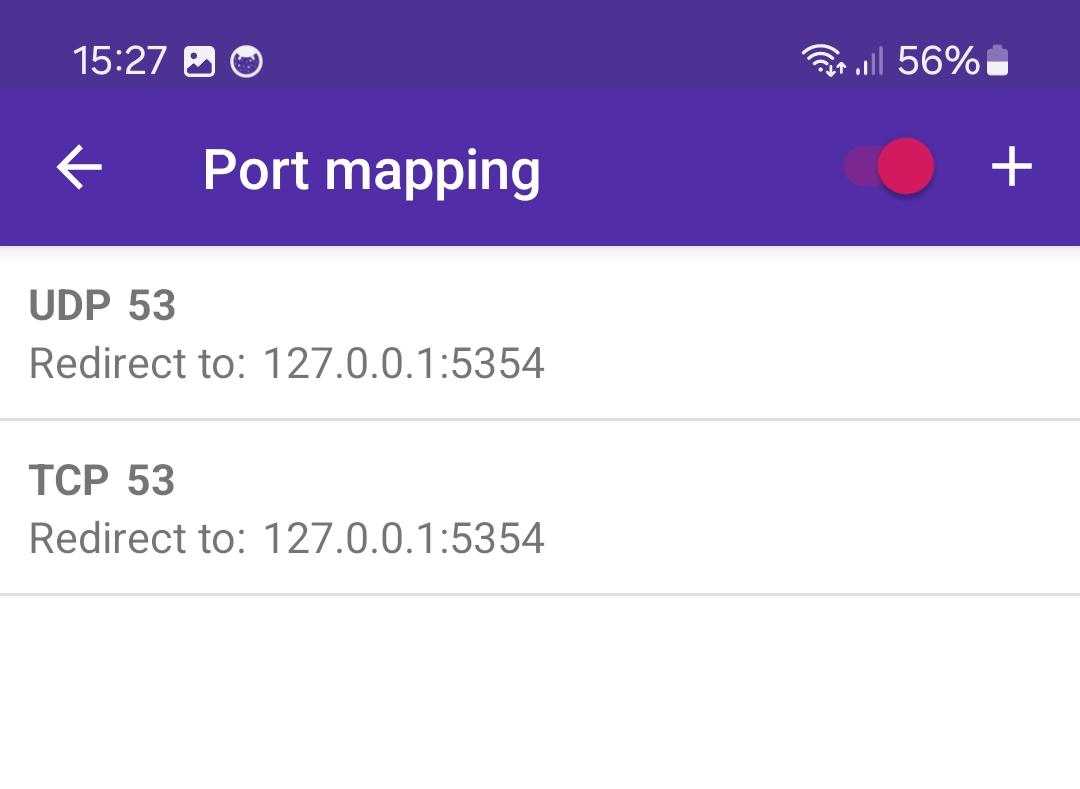
3. Add two port mapping rules to PCAPdroid, one for TCP and one for UDP, to redirect the DNS traffic from port 53 to port 5354, where the InviZible proxy is listening
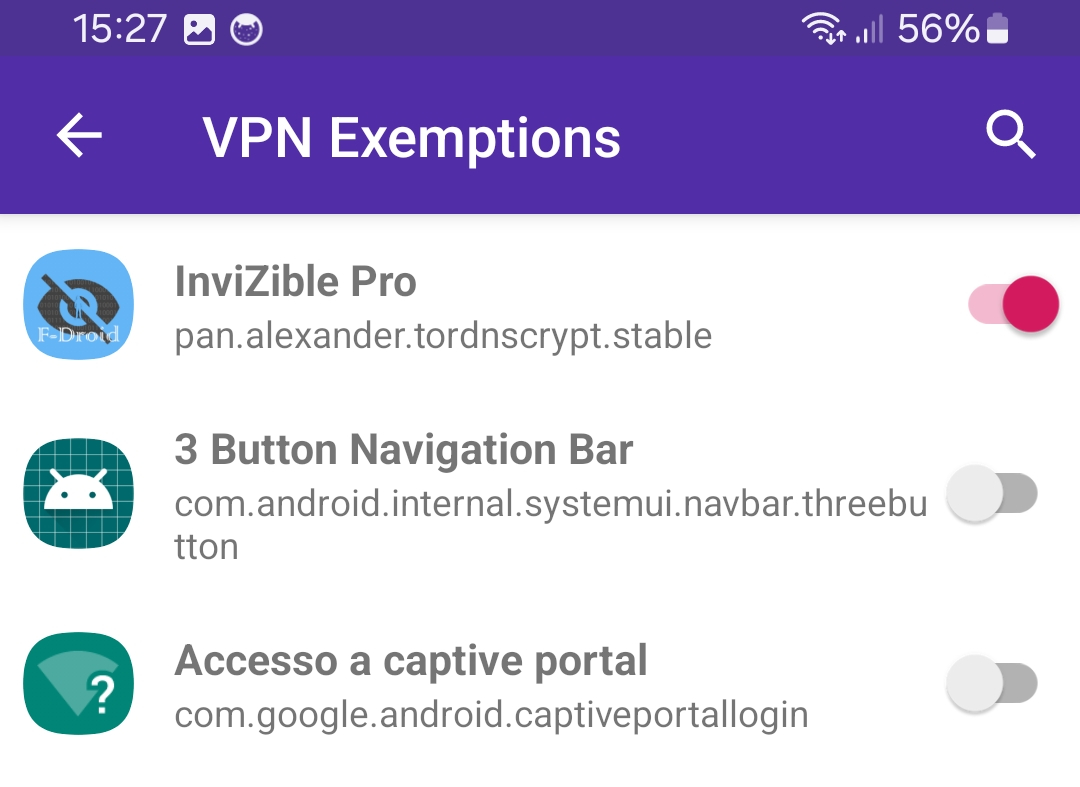
4. From the 3 dots menu, add InviZible to the port mapping Exemptions. This is necessary to avoid traffic loops.
5. Start the PCAPdroid capture. DNS requests should now be redirected to InviZible proxy and then encrypted. In the Connections view, these are marked with a back arrow icon.
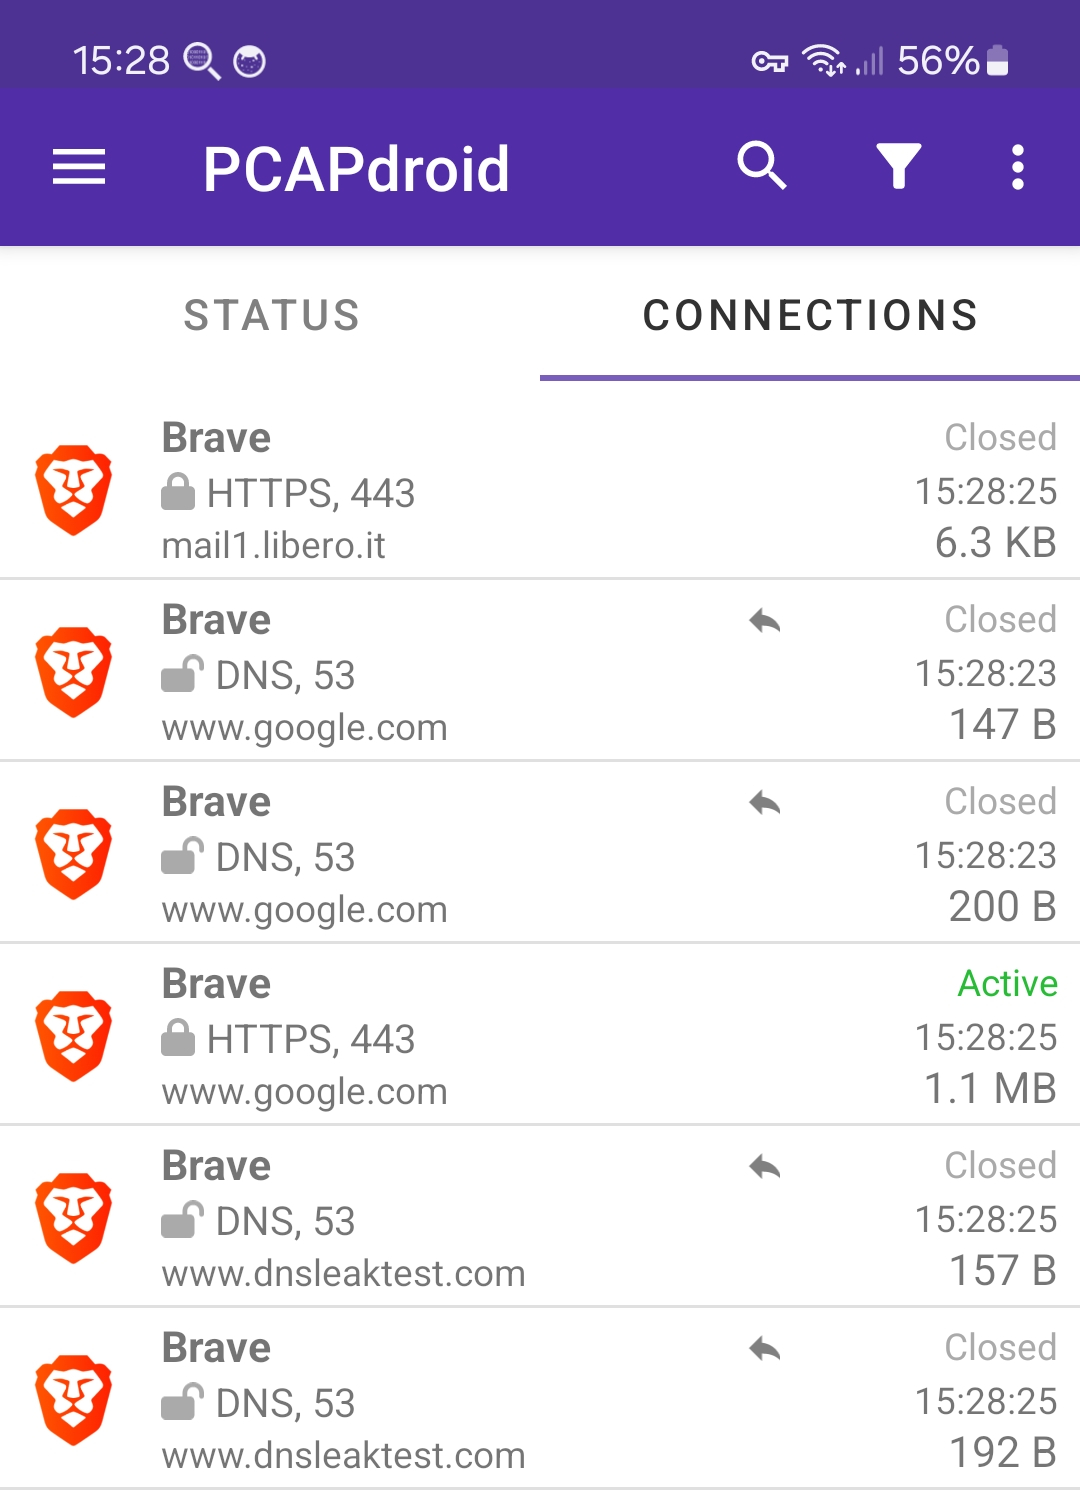
Your DNS requests should be encrypted now. You can verify this by performing a DNS leak test, e.g. via https://www.dnsleaktest.com, which should show the DNSCrypt DNS servers in place of your ISP ones. From InviZible you can configure DNSCrypt settings, such as enable/disable DNS-over-HTTPS, enforce DNSSEC, etc.
4.3 IPv6 Support
PCAPdroid supports IPv6 TCP/UDP connections. IPv6 must be manually enabled from the VPN settings. By default, IPv6 is disabled, in which case no IPv6 internet connection will be established (or monitored) when PCAPdroid is active. When enabled, all the IPv6 unicast traffic will be monitored by PCAPdroid.
In order to avoid getting a “Unreachable” connections errors, IPv6 should only be enabled when the primary data connection (e.g. 4G or WiFi) actually supports IPv6. In general, you can safely disable IPv6 unless you actually want to monitor an IPv6 service.
4.4 Root Capture
Since version 1.3.6, it’s possible to capture the network traffic directly from the network interface of the Android device without creating a VPNService. This allows PCAPdroid to run while other VPN apps are running. A rooted device is needed to use this feature.
In this mode, PCAPdroid performs a “raw” capture, meaning that real packets are captured as they appear on the network interface. This means that the limitations described in the PCAP Reliability section do not apply. It’s important to note, however, that PCAPdroid will skip the Ethernet headers to provide the same PCAP format regardless of the network interface in use.
While common network tools like tcpdump require you to select a specific network interface, PCAPdroid automatically detects the internet-facing interface and it captures the packets from it. Moreover it automatically changes the capture interface when, for example, the device switches from WiFi to the mobile network.
The root capture feature can be enabled from the app settings. It is only displayed when root access is detected, so if you are using magisk hide you will need to whitelist the app. Root permissions will only be asked while starting the capture. PCAPdroid will spawn a daemon process as root and will communicate with it to capture the packets. The daemon will be stopped when the capture is stopped from the app.
Please note that the following limitations apply for this mode:
- The SOCKS5 proxy is not available. This means that the TLS decryption is not available with root capture enabled
- Ethernet data will not be shown
- Domain names for DNS requests sent via DoH will not be visible. You need to disable/block DoH if you want to extract domain names
- The connections status show in PCAPdroid does not currently reflect the actual status of the connections in linux
- Some broadcast/multicast connections may have a wrong traffic direction
- If you apply an app filter, you may miss some DNS traffic generated by the netd service
- The UID of short-lived connections may be wrongly reported as unknown. When an app filter is set, this may result in some connections to be ignored by the filter. The reasons for this are explained in this issue
4.5 PCAPdroid Extensions
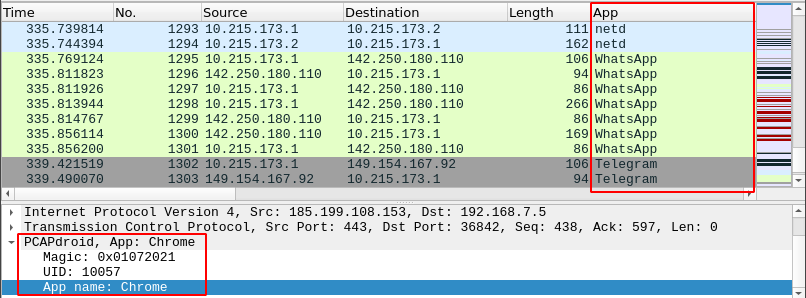
By enabling the PCAPdroid extensions option (called PCAPdroid trailer on older versions) it is possible to add additional metadata to the exported packets. Such metadata includes the app name and UID of the originating process. This information can be processed by third-party monitoring tools e.g. Wireshark.
By using the custom pcapdroid.lua plugin, it is possible to interpret the metadata into Wireshark, displaying the metadata fields as columns and even apply them as a filter. The plugin should be placed into the plugins directory or it can be manually loaded on the linux cli with -X lua_script:tools/pcapdroid.lua.
PCAP Format
When dumping in the PCAP format, enabling the PCAPdroid extensions will add a fake Ethernet header to the packets, to encapsulate both the PCAPdroid trailer and the original IP header and data. This makes it possible to recover the original capture data by simply skipping the Ethernet header and removing the Ethernet trailer. The Ethernet trailer is padded with zeros so that the PCAPdroid trailer starts on a 4-bytes boundary. Here is a description of the fields in the PCAPdroid trailer:
| Offset | Size (Bytes) | Name | Type | Description |
|---|---|---|---|---|
| 0 | 4 | magic | uint32 | Trailer magic: 0x01072021 |
| 4 | 4 | uid | int32 | Process UID, -1 if unknown |
| 8 | 20 | appname | string | App package name |
The appname field contains the app package name truncated to 19 characters, which is useful to quickly spot an app without having to manually resolve it from the uid. The total per-packet overhead when the trailer is enabled is 14 B (Ethernet) + padding + 28 B (trailer) + 4 B (Ethernet FCS) = 46 B + padding. The padding varies from 0 to 3 bytes.
Pcapng Format
When dumping in the Pcapng format, the PCAPdroid metadata is added as Pcapng custom blocks with the 62652 PEN. In parcular:
- a
pcapng_pd_uid_map_blockis added for each seen app. It contains the UID, package name and app name - a comment option is added to the Enhanced Packet Blocks for each packet, in the form “u-uid”, where uid is the numeric UID value
This allows saving some space in the capture, as the app info is only stored once and can be retrieved via the UID. See pcap_dump.h and pcapdroid.lua for more info.
4.6 Js Injector
The Js Injector, which is part of the PCAPdroid mitm addon, allows you to inject Javascript code into web pages. Scripts can be added from the mitm addon UI, by specifying the URL of the script to load. Scripts contain an header, which specifies the script metadata. It’s syntax is similar to the one used by tampermonkey, but scripts are not compatible. Here is an example:
// @name Alert test
// @description Displays an alert dialog on google.it
// @author Emanuele Faranda
// @version 1.0
// @match *://www.google.it/*

alert("Js Injector works");
This script will be injected on web pages matching the google.it domain, diplaying an alert dialog. You can use the *://*/* match to inject a script to all the web pages.
You can test the above script by adding it via the following URL: https://pcapdroid.org/alert.js.
Upon a successful injection, the connetion will be marked in PCAPdroid with a “JS” icon. Opening the connection details will show the name of the injected script.
![]()
In order to make script injection effective, ensure to:
- Add the browser app or the specific URL to the Decryption list, to decrypt it
- In PCAPdroid, block QUIC. This ensures that web pages are not upgraded to QUIC, whose decryption is not supported yet
- Flush the browser cache, to ensure that the browser does not use a cached web page
4.7 Tor
To use Tor at the same time as PCAPdroid, you can either use InviZible Pro or Orbot as the Tor provider. If you use Orbot, ensure to disable the Orbot VPN mode.
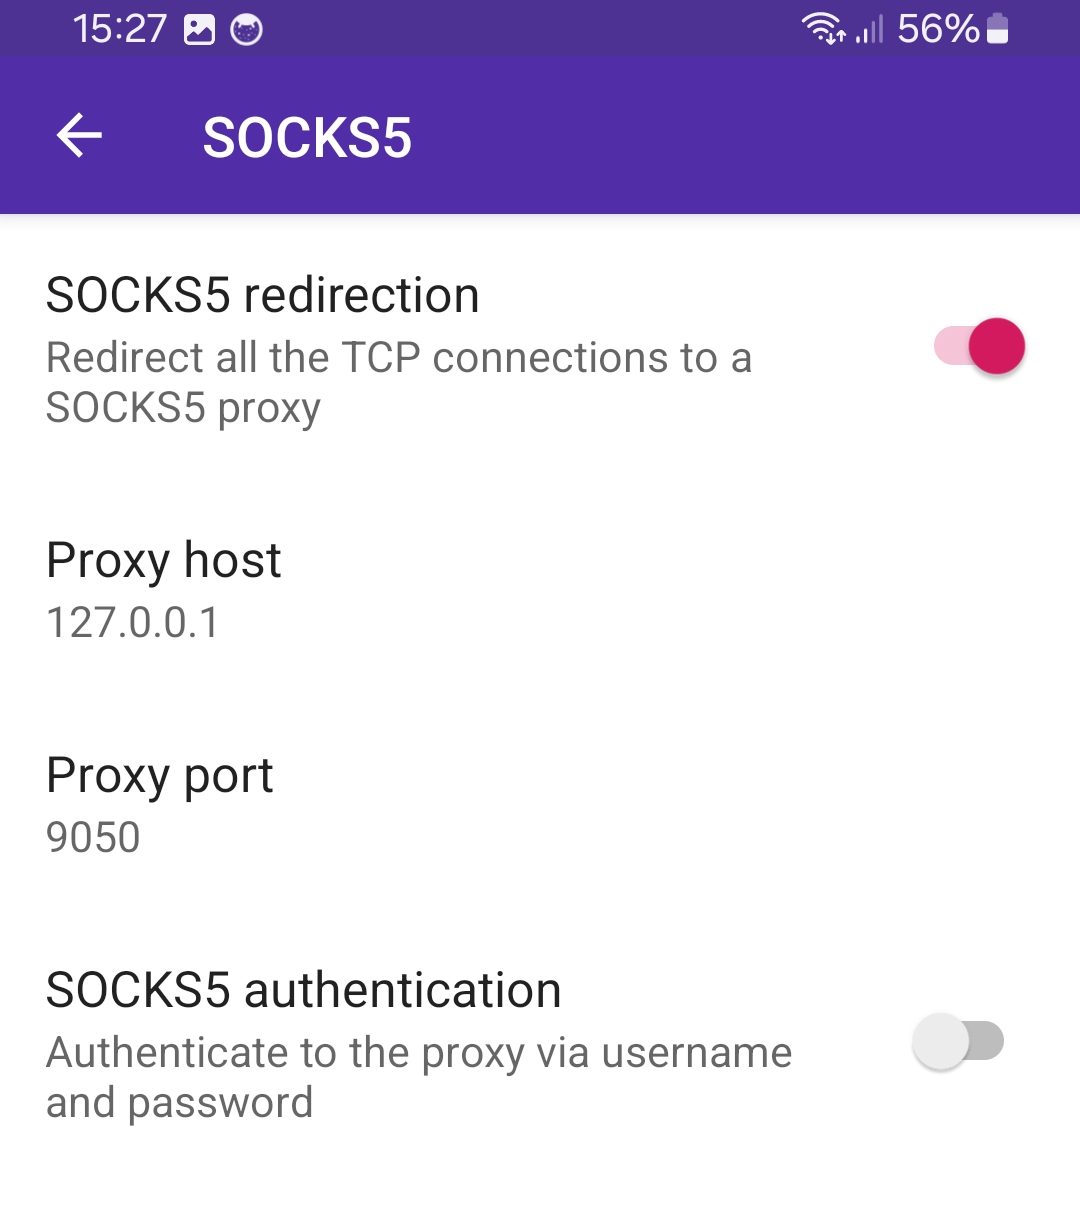
Start the Tor provider and open the PCAPdroid SOCKS5 settings. Set the host to 127.0.0.1, the port to 9050 and enable the SOCKS5 proxy.
Starting the PCAPdroid capture will now redirect your TCP connections to Tor (NOTE: not UDP, see #212). Your public IP should now be one of the Tor exit nodes. In this mode, to avoid DNS leaks, it’s also adviced to configure DNSCrypt as explained above.