3.1 Introduction
PCAPdroid can decrypt the TLS traffic and display the decrypted payload directly into the app. Moreover, it can generate a pcapng file, which you can load in tools like Wireshark to analyze the decrypted traffic.
Most apps today employ TLS to secure their data against inspection and tampering. Such connections are reported in PCAPdroid with either the TLS or the HTTPS protocol. Decryption can be useful in the following contexts:
- Check if an app transmits sensitive information or unhashed passwords
- Reverse engineer the protocol of an app, e.g. to extract the REST API endpoints
- Debug protocol-related issues without disabling the TLS encryption
Note: before decrypting, you should check the app ToS to see if this is allowed
Note: running TLS decryption will weaken the security of your app. You should only do this if you know what you are doing and for a limited amount of time
Current limitations:
- Decrypting QUIC traffic is not supported yet. In PCAPdroid, you can enable blocking of QUIC, which causes some apps to fallback to TLS, thus making them decryptable
- Decrypting STARTTLS is not supported yet
- There are some protocol-specific limitations, check out the mitmproxy docs for more details
TLS decryption on Android is not an easy task, technical knowledge and familiarity with the topic is required. There are many caveats which are being discussed below. A rooted device will help you being successful in most circumstances.
3.2 Initial setup
TLS decryption can be enabled from the PCAPdroid settings.
In PCAPdroid settings (top right ⚙️ icon), toggle TLS decryption switch under Traffic inspection menu.
The first time decryption is enabled, a setup wizard will help you properly setting up decryption. It includes the following steps:
- Download and installation of the PCAPdroid-mitm addon. The actual decryption is performed by mitmproxy, which is bundled into the addon
- Permission to control the mitm addon. This is a security measure to prevent other apps from controlling the addon
- Installation of the PCAPdroid CA certificate. The CA certificate is what allows PCAPdroid to decrypt the app data, and to do so, it must first be added to the certificate store. To increase security, a unique CA is generated at runtime by PCAPdroid
Before proceeding, check if your device has Autostart or similar software which prevents background services execution, in which case you will need to whitelist the mitm addon, otherwise decryption will refuse to start.
3.3 Decrypting
In order to decrypt connections, you first need to define some rules. You can do this either from the “Decryption rules” in the left drawer or by long pressing a connection and selecting a decryption criterion from the context menu. Please note that, due to Android security measures, decryption on common apps will not usually work, and will cause the apps to stop working. Read the section below to understand and possibly bypass these protections.
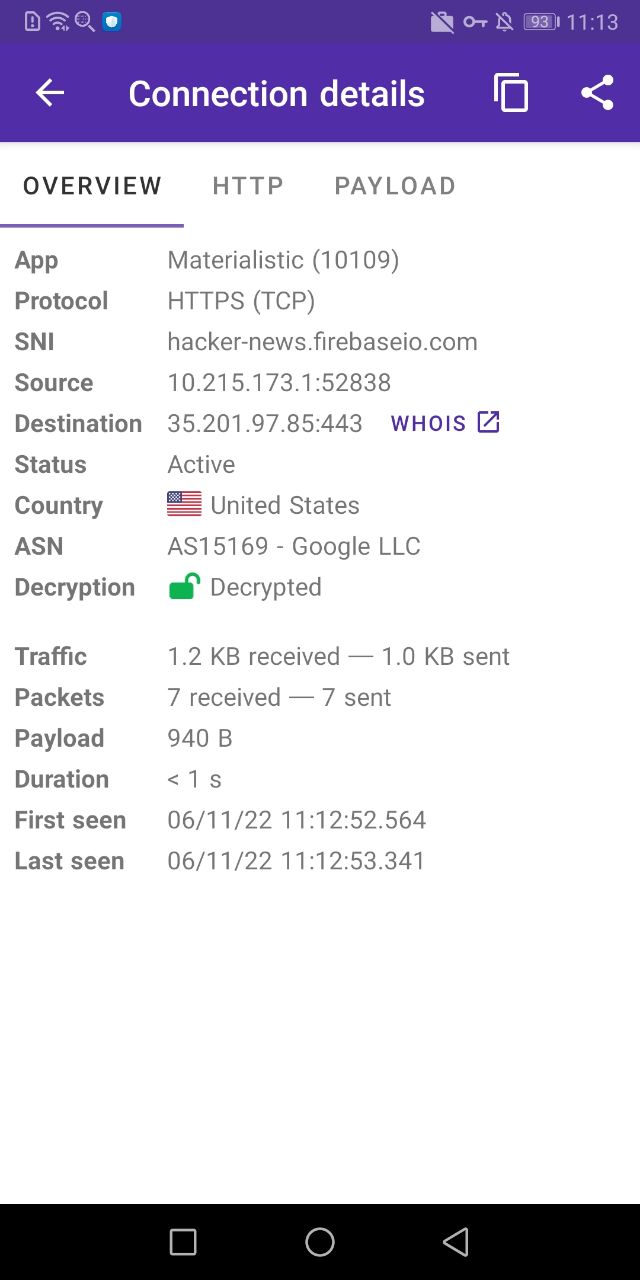
The first test you should do to verify that decryption works is to choose an app which is easy to decrypt. It turns out Google Chrome is a good candidate. Enable decryption, select Google Chrome as the target app and then start the capture in PCAPdroid. In chrome, open a new tab and a new HTTPS website (or just clear the browser cache) and you should start seeing decrypted connections in PCAPdroid. These are marked with a green open lock.
The lock icon and color indicates the decryption status, which is also reported into the connection details:
- green: decryption successful
- red: decryption failed. If you tap on the connection, you should get an error message explaining why it failed
- orange: decryption is not supported for this protocol/app (e.g. for QUIC and some specific apps, see below)
- gray open lock: the connection is not encrypted (e.g. plain DNS)
- gray closed lock: decryption not available yet (e.g. no decryption rule configured, or waiting for application data)
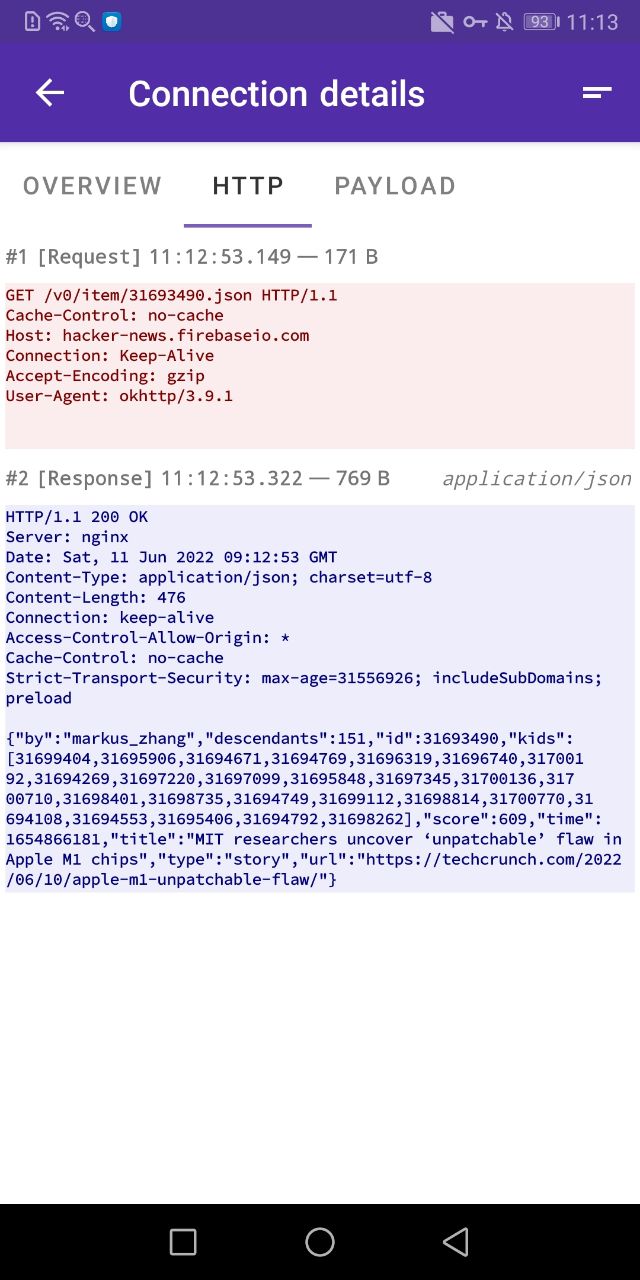
You can easily show decrypted or decryption-failed connections via the “Edit Filter” dialog under the filter icon. If you tap on a decrypted connection, the payload and the HTTP tabs will show the decrypted payload data.
If the PCAP dump is enabled, after you stop the capture you will be prompted to save the SSLKEYLOGFILE, which you can load in Wireshark to decrypt the PCAP file. Alternatively, to simplify the process, you can embed the keylog directly into the pcapng file.
3.3.1 Exclude specific hosts/ports
Decryption rules already allow you to define what needs to be decrypted. However, in some cases it’s easier to create a rule to decrypt a whole app and only exclude specific hosts or ports. For this you can use the mitmproxy –ignore-hosts option, setting it in the “Additional mitmproxy options” in the PCAPdroid settings.
For example, to avoid decrypting connections to port 1234, you can use --ignore-hosts .*:1234.
3.4 Caveats and possible solutions
Google Chrome is a relatively easy app to decrypt. If you try to decrypt other apps you will soon face some problems, which can mostly be addressed with a rooted device and the right tools.
3.4.1 The client does not trust the mitm certificate

If you see the above error “client does not trust proxy’s certificate” while decryption, it may occur due to the following reasons:
- Starting from Android 7, when targeting the Android SDK 23 or later, apps no longer trust any user-installed certificates and instead rely only on the system-installed certificates i.e. those that came pre-installed in your phone’s OS, installed by default
- An app may use its own internal database of root certificates. For example some apps (mainly browsers) implement a custom certificate trust store, separate from the system store. This will prevent them from using any certificates stored on your device certificate store. You should check if they have an option to disable it. For example, in Firefox, you can do this via
about:config. If such option is not available, you will need to patch the app - The app may employ Certificate pinning security measure which means that the app actively performs certificate verification against a whitelist embedded in the app. This is usually set through network_security_config.xml file in the app code. We shall discuss solutions for this in following sections
Using a rooted Android device
- On a device rooted with Magisk, you can install the Custom Certificate Authorities module (Android 11+) or the MagiskTrustUserCerts module, and then install the hashed certificate (replace
mitmproxy-ca-cert.cerwith the PCAPdroid certificate name) as a system certificate. This is the suggested solution if you have Magisk - On any rooted device, you can install the certificate into the system store, by mounting the system partition as read-write (rw)
- Alternatively you can install the LSposed module. Then install the sslunpinning module
- You can use VirtualXposed to virtualize your app, making it run as it was SDK 23 (Android 11 and later currently not supported). To do so, open VirtualXposed, select “Add App” and install the target application that you want to decrypt (use the “virtualxposed” method). Then in PCAPdroid, select VirtualXposed as the target app for the decryption. Virtualization is quite unreliable, so expect crashes
Using a rooted Android emulator
- If you don’t want to root your device or can’t root it, you can try the same above steps on an Android emulator and it should give the same results. The recommendation for Android emulator is Android Studio’s default virtual device manager as it will give you options of emulator with all sdk versions. Here is a video tutorial on how to set up an Android emulator and root it
Patching the APK
- You can use apk-mitm which automates rebuilding the apk with the pinning logic disabled and signs the apk for installation without errors
- Another tool that could be useful is android-unpinner which may have some benefits over the apk-mitm tool
- You can use apktool to decompile the app, lower its target SDK to 23, and rebuild it
- If you have the app source code and can build the app, refer to the Android guide to trust the PCAPdroid CA.This would require you to have android studio or another IDE installed for editing the code and build the app. In the network security config xml, you can specify top level domains (TLDs), for example
<domain includeSubdomains="true">com</domain>, to use the CA to mitm any.comdomain. To specify the certificate, rename the PCAPdroid CA certificate you exported during the TLS decryption setup topcapdroid.crtand place it under therawresources folder. Please also note that some libraries may use a custom trust store; refer to their documentation on this subject
Reverse engineering APKs and other advanced topics
- If none of the above mentioned method works, then the app may use custom pinning logic, in which case you will need to decompile the app, analyse the code and then patch and rebuild it. Commonly used softwares for decompiling and patching apps are JADX, apktool or the APKLab extension in Visual studio code. Refer to this blog post for a full guide on reverse-engineering and decompiling apps using the above tools.
- Along with patching an Android app, you could take help of tools like Objection and Frida tools to bypass ssl pinning. For a full guide on how to use these tools, you can refer to this video tutorial. Instead of using the Burp Suite as in the tutorial, you could instead use pcapdroid-mitm or an external mitmproxy, if you just want to decrypt TLS traffic
- You can also refer to the OWASP mobile security website which has a repository of mobile application pen-testing and reverse-engineering tools discussed in-depth. You can refer to various OWASP uncrackable app tutorials on youtube for more insight.
3.4.2 Certificate transparency
When decrypting a browser traffic, the browser may refuse to connect to websites giving you an error about certificate transparency. With Certificate transparency, custom system CA are normally rejected. To fix this, you either need to:
- in some browsers, you can disable certificate transparency, e.g. in bromite via
chrome://flags - uninstall the PCAPdroid CA from the system store or simply temporary disable it from the Android security settings
- if the PCAPdroid system CA is installed via a Magisk module, then you can use magisk hide on the browser to make it see the PCAPdroid CA as a non-system CA
3.4.3 Traffic is still encrypted
After decrypting the TLS traffic, the decrypted payload may still be encrypted with another protocol. This occurs, in particular, with Telegram and Whatsapp, which use a custom encrypted protocol. Such protocols require the development of custom tools for the decryption, which are out of the scope of PCAPdroid.
Moreover, beware that the result of decryption may produce a binary protocol, which is not in a human-readable form. It’s important to understand that a binary protocol does not necessarily mean that the protocol is encrypted. For example, DNS is a binary protocol but it’s not encrypted.
3.5 Decrypting via an external mitmproxy
For better flexibility, e.g. to modify the traffic or use an upstream proxy, you can perform the TLS decryption on a third-party SOCKS5 proxy, possibly located into another device. Here is an example on how to configure mitmproxy for this.
On a PC, you can install mitmproxy by following the official installation guide. Both the Android device and the PC should be connected to the same network for this to work. As an alternative, you can install mitmproxy directly on the Android device in termux. After installing the termux app, open it and run the following commands:
pkg update
pkg install python openssl-1.1-static
python3 -m pip install --upgrade pip

CRYPTOGRAPHY_DONT_BUILD_RUST=1 CRYPTOGRAPHY_SUPPRESS_LINK_FLAGS=1 \
  LDFLAGS="$PREFIX/lib/openssl-1.1/libssl.a $PREFIX/lib/openssl-1.1/libcrypto.a" \
  CFLAGS="-I$PREFIX/include/openssl-1.1" \
  pip install mitmproxy==7.0.4
This installs mitmproxy 7.0.4, which is the latest version to not require rust. If you want to install version 8+, refer to these instructions.
Note: when installed on the Android device via termux, it’s essential to set an app filter in PCAPdroid to only capture a specific app traffic, otherwise the termux mitmproxy traffic would run in a loop, breaking the phone internet connectivity.
After installing mitmproxy, you need to perform the following steps:
- Run
mitmproxywithout options to generate the mitm certificate. Install the certificate (usually~/.mitmproxy/mitmproxy-ca-cert.cer) in the Android phone. It may be needed to change the extension to.crtto install it - Open the PCAPdroid settings
- Toggle “Enable SOCKS5 Proxy”
- Set the IP address and port of the remote mitmproxy instance (port 8050 in this example)
- Run mitmproxy in SOCKS5 mode, e.g. via
mitmproxy --mode socks5 --listen-port 8050
PCAPdroid will now redirect all the TCP traffic to the mitmproxy server, which will proxy the connections and decrypt the TLS traffic. Please note that the PCAP generated by PCAPdroid will still contain the encrypted traffic with the original IP destinations and ports.
3.6 Custom mitmproxy addons
Since PCAPdroid 1.7.0, you can load your custom mitmproxy addons. The following example will show how to do this to modify the HTTP response of a website.
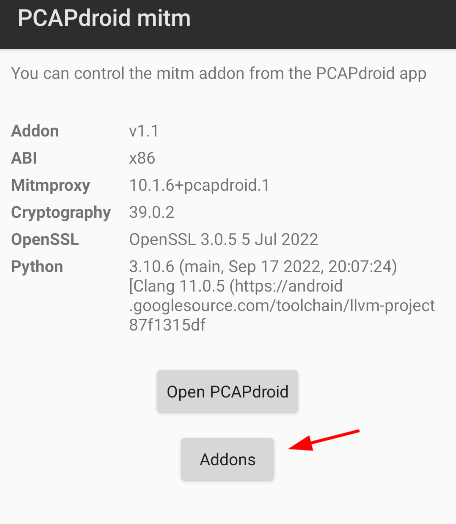
First of all you need to specify the directory from where the addons should be loaded. To do this, create new directory on the device (/sdcard/PCAPdroid_addons in this example), then open PCAPdroid mitm, tap on “Addons” and then on “Set user dir”.
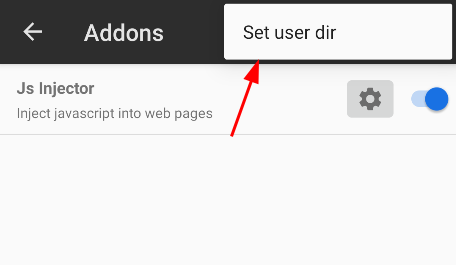
Select “Allow” to grant PCAPdroid the ability to read the directory.
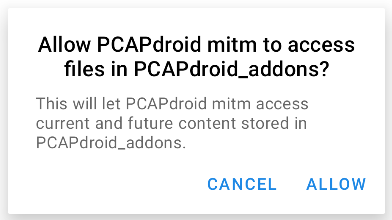
By default, custom addons run in the private app directory, which is not accessible by other apps. If you want your addons to read or write public files, e.g. the ones under /sdcard or the selected addons directory, select “Enable files access” from the same hamburger menu and grant the related permission.
In selected addons directory, create the following script (or create on a pc and transfer via adb push "Modify HTTP.py" /sdcard/PCAPdroid_addons):
# Modify HTTP.py
class ModifyHttp:
def done(self):
# addon unloaded, close global resources (e.g. open files) here
pass
def response(self, flow):
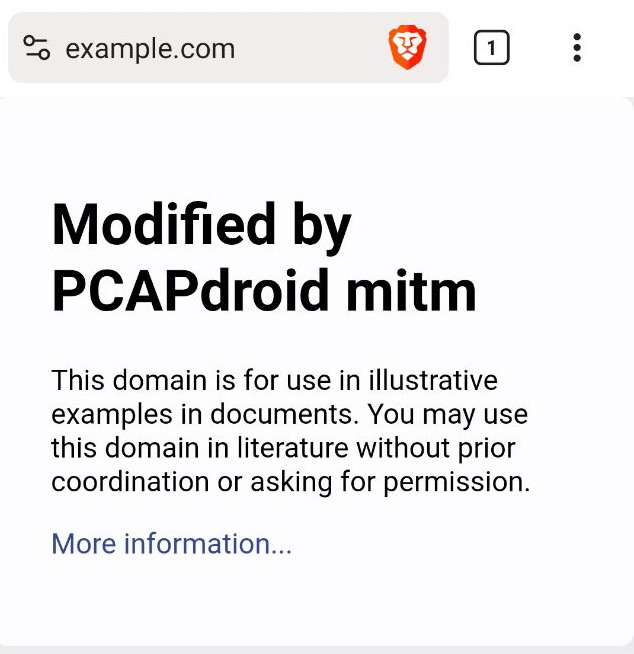
if flow.request.pretty_url == "https://example.com/":
flow.response.content = flow.response.content.replace(
b"Example Domain",
b"Modified by PCAPdroid mitm")
print("HTTP response modified")
addons = [ModifyHttp()]
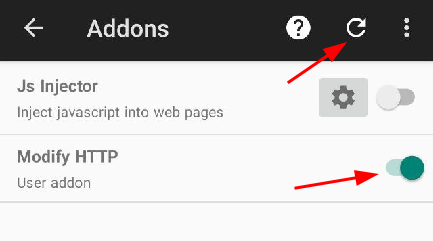
This addon will modify the HTTP response of the https://example.com web page, by changing the “Example Domain” text with “Modified by PCAPdroid mitm”. After copying it to the addons dir, in the Addons activity click the refresh icon and the addon should appear. Now enable it via the toggle and restart the PCAPdroid capture with TLS decryption.
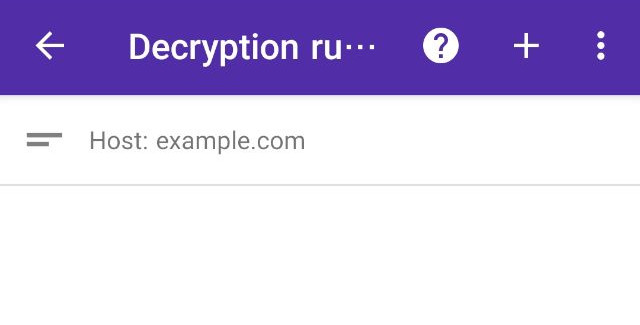
The addon will only be executed on decrypted connections, so be sure to create a decryption rule either for the “example.com” domain or for your browser app.
When connecting to https://example.com, you should now see the “Modified by PCAPdroid mitm” text.
Note: the web browser may cache the HTTP reply, so be sure to flush the browser cache. To prevent this, you may consider adding --anticache to the “Additional mitmproxy option”.
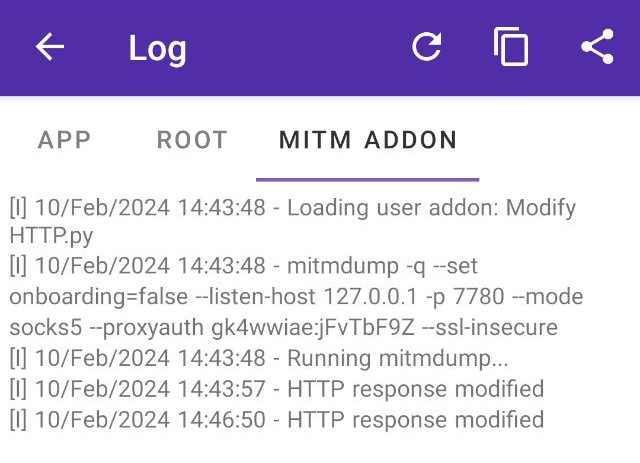
The mitm addon log will also show the “HTTP response modified” message, from the addon print.
Check out the mitmproxy addons and events references to know more about the mitmproxy API to use in your addons.